
Introduction
Installing a reversing camera in your car is one of the best upgrades for safety and comfort. It helps you see behind your vehicle while parking or reversing, reducing the risk of accidents, scratches, or hitting obstacles. Many modern cars already come with this feature, but older vehicles often need a manual installation.
This detailed guide is written in very simple English so anyone—even a Grade 7 student—can understand it easily. You do not need to be a professional mechanic. With basic tools and patience, you can complete the installation at home.
In this article, we will explain every step clearly, from understanding wires to connecting the display screen. We will also cover safety tips, tools, common mistakes, and expert advice based on real automotive practices in 2026.
We will also simplify technical ideas like power supply, grounding, and signal wiring so you never feel confused. By the end, you will fully understand how a reversing camera wiring guide works in real-life car installation.
Understanding the Basics of a Reversing Camera System
A reversing camera system is made of three main parts: the camera, the display screen, and the wiring system that connects everything together. The camera is usually installed at the back of the car, often near the number plate. The screen is placed inside the dashboard or rear-view mirror area.
When you shift your car into reverse gear, the camera automatically turns on and shows the back view on the screen. This helps the driver avoid obstacles.
The wiring is the most important part because it connects power and video signals. Without correct wiring, the system will not work properly.
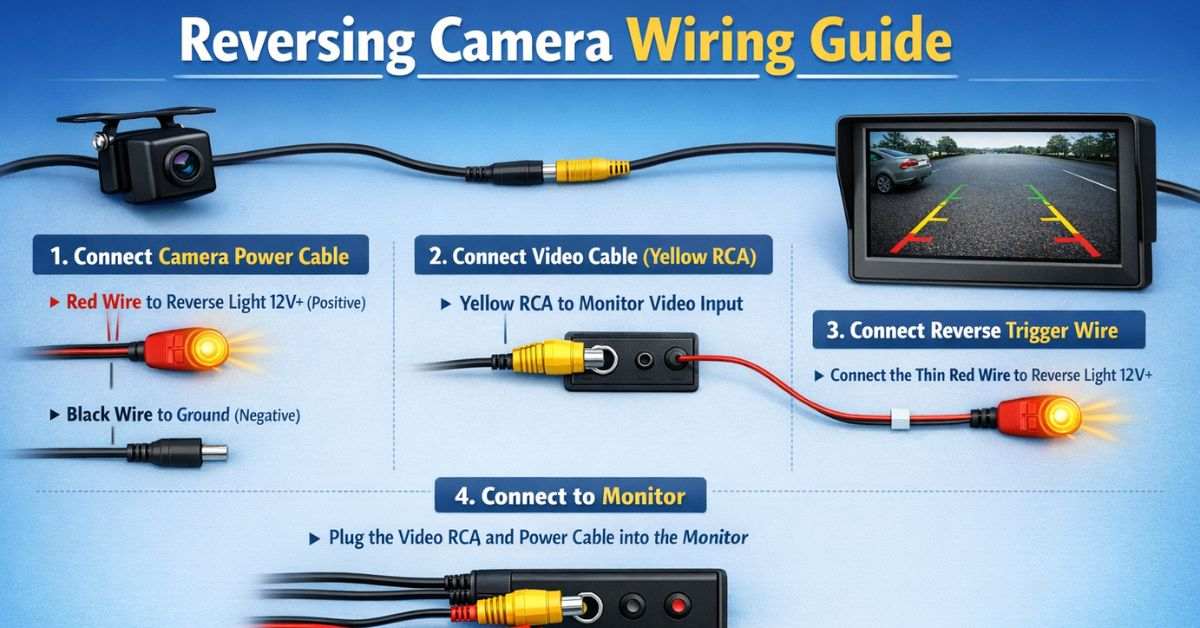
A basic reversing camera wiring guide usually includes:
- Power cable (red and black wires)
- Video cable (RCA connector)
- Reverse trigger wire
Understanding these parts makes installation much easier and safer.
Tools and Materials You Need
Before starting installation, you must gather all tools. This saves time and avoids mistakes.
Common tools include:
- Screwdrivers
- Electrical tape
- Wire strippers
- Drill machine (if needed)
- Multimeter for testing voltage
Materials include:
- Reversing camera kit
- Extension wires
- Fuse tap (for safe connection)
- Cable clips
Here is a simple checklist table:
| Tool/Material | Purpose |
|---|---|
| Wire stripper | Removes insulation from wires |
| Electrical tape | Secures wire connections |
| Multimeter | Checks voltage and power |
| Fuse tap | Safe power connection |
Using proper tools ensures a smooth installation process and avoids electrical damage.
When following a reversing camera wiring guide, preparation is always the first step to success.
How the Wiring System Works
The wiring system connects power from the car battery to the camera and screen. It also sends video signals from the camera to the display.
There are three main connections:
- Power connection (12V supply)
- Ground connection (negative wire)
- Video transmission line
The camera usually gets power from the reverse light. This is important because it ensures the camera only turns on when the car is reversing.
A simple flow looks like this:
Car Reverse Gear → Reverse Light Power → Camera Turns On → Video Sent to Screen
Understanding this flow helps beginners avoid confusion during installation.
In every reversing camera wiring guide, this wiring logic is the most important concept to learn first.
Step-by-Step Camera Installation Process
Now let’s look at the installation process in simple steps.
Step 1: Mount the Camera
Fix the camera near the rear number plate using screws or adhesive.
Step 2: Connect Power Wires
Attach red wire to reverse light positive and black wire to ground.
Step 3: Run Video Cable
Pass the RCA video cable from the back of the car to the dashboard.
Step 4: Connect Screen
Attach the video cable to the display unit inside the car.
Step 5: Test System
Shift into reverse gear and check if the screen turns on.
Be careful while routing wires so they are not exposed or damaged. Always use clips to secure them properly.
A clear reversing camera wiring guide helps avoid mistakes during each step.
Power Connection and Safety Tips
Power connection is the most sensitive part of installation. If done incorrectly, it can damage your camera or car electrical system.
Always:
- Use correct voltage (usually 12V)
- Connect to reverse light circuit
- Avoid direct battery connection without fuse
Safety tips:
- Disconnect car battery before starting
- Use insulated tools
- Never leave exposed wires
Here is a simple safety chart:
| Risk | Prevention |
|---|---|
| Short circuit | Use fuse protection |
| Wire damage | Secure with clips |
| Electrical shock | Disconnect battery |
Following safety rules is essential in any reversing camera wiring guide to prevent damage or accidents.
Video Cable Setup and Routing
The video cable carries the image from the camera to the screen. It must be installed carefully to avoid signal loss.
Best practices:
- Run cable along car edges
- Avoid sharp bends
- Keep away from hot engine parts
Most cars use RCA cables because they provide clear video quality.
Proper routing ensures stable performance and long-lasting system life.
A professional reversing camera wiring guide always emphasizes clean cable management to avoid future problems like flickering or no signal.
Common Wiring Problems and Fixes
Sometimes the camera may not work even after installation. This is usually due to small wiring mistakes.
Common problems:
- No display on screen
- Camera not turning on
- Blurry image
- Signal delay
Simple fixes:
| Problem | Solution |
|---|---|
| No power | Check reverse light connection |
| No video | Inspect RCA cable |
| Flickering screen | Tighten loose wires |
Most issues come from loose connections or incorrect wiring. Double-check everything carefully.
Even in a professional reversing camera wiring guide, troubleshooting is an important step.
Advanced Tips for Better Performance
Once your camera is installed, you can improve performance with small upgrades.
Tips include:
- Use high-quality camera lens
- Add waterproof protection
- Use night vision camera for dark areas
Also, ensure your camera angle is correct. It should show a wide view of the rear area without blind spots.
Good installation leads to better safety and driving confidence.
Advanced users often improve their system after following a basic reversing camera wiring guide by upgrading components for better clarity and durability.
Legal and Safety Considerations
In most countries, reversing cameras are legal and recommended for safety. However, installation must follow basic electrical safety rules.
Important points:
- Do not damage car wiring system
- Avoid illegal modifications
- Use certified camera kits
A proper reversing camera wiring guide always follows safety regulations and manufacturer instructions.
Maintenance and Long-Term Care
After installation, regular maintenance is important for long life.
Maintenance tips:
- Clean camera lens regularly
- Check wiring every few months
- Protect cables from water and heat
- Test system before long drives
Simple care improves performance and prevents failure.
A well-maintained system will last many years without issues.
Even a simple reversing camera wiring guide highlights that maintenance is just as important as installation.
Visual Section: Wiring Overview Charts
Basic Wiring Flow Diagram
| Component | Connection |
|---|---|
| Reverse Light | Power Source |
| Camera | Receives Power |
| Screen | Displays Video |
Installation Difficulty Chart
| Level | Description |
|---|---|
| Easy | Plug & play kits |
| Medium | Basic wiring needed |
| Hard | Full custom installation |
These visuals help beginners understand the system quickly and clearly.
FAQs
Is installing a reversing camera difficult?
No, with basic tools and instructions, it is easy for beginners.
Can I install it without a mechanic?
Yes, most people install it at home using simple steps.
What power source is used?
Usually the reverse light circuit provides 12V power.
Why is my camera not working?
Most likely due to loose wiring or incorrect connections.
How long does installation take?
It usually takes 1–3 hours depending on experience.
Conclusion
Installing a reversing camera is one of the most useful upgrades for any vehicle. It improves safety, helps in parking, and reduces the risk of accidents. With the right tools and simple steps, even beginners can complete the installation at home without professional help.
In this guide, we explained everything from wiring basics to troubleshooting in very simple language. The key to success is understanding each connection and following safety rules carefully. Always double-check your power and video connections before testing the system.
Modern driving in 2026 focuses heavily on safety technology, and a reversing camera is now an essential feature, not just an extra option. By following this reversing camera wiring guide, you can confidently install your system and enjoy safer driving every day.
If you are planning to upgrade your car, start with this simple project. It builds confidence, saves money, and improves driving safety.